How To Retrofit Insulation in Existing Metal-Framed Buildings
If you have a metal-framed building with 60" on center framing or 48" on center framing, keep reading to learn how to install BlueTex™ vertically on your building. The 62” wide and 50" wide BlueTex™ products are perfect for up/down vertical installations. On 60” and 48" framing, you will have a 2” overlap to easily attach to the framing and seal the seams. We have both 50" wide and 62" wide options available in the BlueTex™ PRO 2MM or the BlueTex™ SUPREME 6MM.
If your framing does not allow for a vertical install, this metal building insulation guide will also show you how to install BlueTex™ horizontally (left/right) as an option: Alternate Install Method for Metal-Framed Metal Buildings.
Not Sure How Much BlueTex™ You Need?
Before you start, remember that the basic goal during installation is to create an “envelope” inside the frame, made from BlueTex™. This envelope will act as the new interior air barrier, vapor barrier, and thermal barrier all at the same time. Typical installations are done with the foil side of the BlueTex™ facing the exterior of the metal building (with the required airspace between the foil side and the exterior metal) and the glossy white surface facing inside the building.

This will essentially put the metal building “in the shade” from the heat, almost like it was instantly under a giant tree.
Eliminate Condensation
The new interior surface made with the BlueTex™ should minimize or completely eliminate condensation from forming inside the building. As long as this new surface has a temperature that stays above the dew point, condensation will not physically be able to form. Learn more about what causes condensation in a metal building and how to prevent condensation in your metal building.
Because not all metal buildings are identical, you may have to get creative with your installation. If you have a specific question about how to install BlueTex™ in your building, please email us pictures and/or drawings and we will gladly help you.
We do this every day and have seen just about everything when it comes to installations and applications.
Prep: How to Attach to the Metal
Before you begin the installation, you need to determine how you're going to attach the product to your metal framing. Most applications use Self-drilling metal screws and locking washers attached directly to the interior metal framing. With that said, some red-iron or quonset-style buildings may need to use the method of pins and washers since they can't pierce the metal skin. Decide which method is best for your application and use that.
Pre-Installation
1) Choose the Best Way To Attach the Insulation
Most typical tubular steel buildings look similar to the picture below with corner bracing. You need to decide if you want to run ON (blue line) or BEHIND (red line) the bracing with your BlueTex™ Insulation. We recommend the path of the red line, though either approach will work.

We also recommend using BlueTex™ self-drilling screws and locking washers to install BlueTex™ insulation in your building. These washers have a large surface area specially designed to hold the BlueTex™ Insulation to the metal framing. You can find supplies mentioned on our Resources Page.
Fasteners: Using Self-drilling Screws
For this method, you'll attach the BlueTex™ by using a screw gun/drill (cordless works great) to attach round insulation washers with self-drilling 3/4” screws into the framing. We supply screws + washers HERE; no pre-drilling is required when using these screws. We only use/recommend hex-shaped heads (as opposed to Phillips heads). It's super easy if you get a magnetic nut-driver attachment for your drill to help hold and drive the screws into the metal.

The best way to approach this is to attach the edge with the adhesive on the back foil side and attach it directly to the metal frame.

Now that you know which method you're using to attach the product to the metal, let's get started with prepping the metal building for the installation.
2) Pre-assemble and Paint Your Fasteners
This step is optional, but we do recommend this if you're looking for a more professional look. Pre-assemble the screws and locking washers using a drill and work gloves.

Then use cardboard or foam boards and arrange the screws in rows. Paint them white to match the BlueTex™ insulation and let them dry completely.
*This step is usually not needed for screws/washers on the actual seams since you will normally cover them with 3” white tape when you seal the seam.

3) Prepare for the transitions in the corners, the gables and between the walls & roofline
You need to have something in the corners of the metal building to screw the insulation into (a hard corner). We recommend a 2" x 2" piece of wood or ripping some 2x4s (or some scrap wood) and you need enough pieces to go on either side of each corner support, from the ground up to the top of the walls.

To fasten the wood to the metal framing, we recommend using screws that are at least 2.5" long; Teks™ screws or standard self-drilling metal screws work well, but we recommend the hex-head self-drilling screws.


Pre-drill holes into the wood, then add the screws through the wood and into the metal frame. To make the transitions from the walls to the roofline easier, we recommend you add a 1x4 horizontally across the top of the wall directly against the bottom of the roof framing.
Think of it like crown molding, and it will create a hard surface to fasten the BlueTex™ into as it begins going up onto the roofline. This will help create a “sharp” corner from the wall to the roof. Otherwise, it may end up looking crumbled. This is also a great place to put a seam if you want to do the roof and the walls with different pieces.

Sides of the Overhead Door: Use a 2x2 and use an industrial adhesive to glue the wood directly onto the metal skin and let it dry overnight. This will make attaching the BlueTex™ around the door simple, and it will look much nicer than any other method.

Now that you've done all the prep work, you're ready to get started with the installation.
Not Sure How Much BlueTex™ You Need?
Begin Your Installation on the Roof
With 60" OC framing, you will install the BlueTex™ vertically. We recommend doing the roof first and then doing the sidewalls. The reason being is that you will get the hardest part done first, and the 1x4 installed earlier is the perfect place to make the connection from the roof to the wall.

The reason being is that you will get the hardest part done first, and the 1x4 installed earlier is the perfect place to make the connection from the roof to the wall.
STEP 1: Start at the Roof

Our Preferred Method:
We recommend you use a single piece for the roof and do an up-and-over method. Based on customer experience, this approach usually works best. Start at the top of one wall and run the BlueTex™ up one slope of the roof and down the other slope and terminate on the 1x4 wood header installed earlier. Then do the walls as separate pieces with the seams on the 1x4 wood header. To make things easier for you, use a clamp to temporarily hold the BlueTex™ up on the frame near the top center. This will keep it out of your way as you work.
This method will use three different pieces and two seams for each framing cavity.
To begin, attach BlueTex™ to one side top of the wall on the 1x4 you installed earlier. Then, run up and over to the other top of the wall 1x4. You can use the 1x4 as a “cutting board” to get a clean, straight cut. Continue until all roof panels or sections are done.

After you're done with the roofline, do the corresponding wall sections. For this, you’ll use three different pieces and two seams for each framing cavity.
Alternative Method:
Depending on the size of your metal building, you can go all the way up one wall, go onto the roofline up to the peak, then come back down the other slope of the roof and down the opposite wall, terminating at the floor - using one long piece. This method does have fewer seams, but it’s usually more difficult as you’ll be working with longer and larger pieces.
Step 2-A: The Side Walls
START AT THE TOP: Use the clean-cut edge of the BlueTex Insulation and run up to the corner where the roof piece terminates onto the 1x4. Then, straighten the piece up/down (use the edge of the framing) and use two screws/washers to attach the top to the top 1x4.
Then, pull tight downward and use two screws/washers to attach to the bottom tube. Then, remove the paper backing on the back and stick it to one side of the frame. Next, repeat this process on the next wall section.
The seam opposite the tape side attached to the frame with the tape should overlap about 2” and have two layers. Use several screws/washers to permanently attach the insulation to your framing.
On taller walls, you might want to go ahead and use one or two screws/washers down the sides. Then, repeat on the next frame cavity. Once this piece is up you can install several screws/washers through both layers of BlueTex™ into the framing.
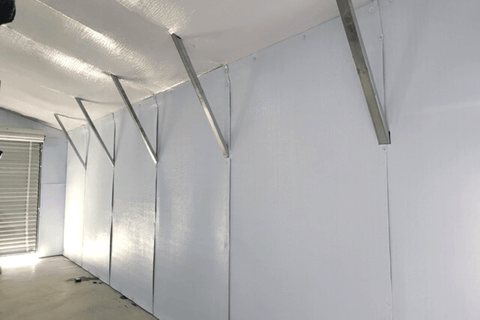


STEP 2-B: The Wall Corners
When you get to the corners you should have at least two inches (or more) at the end. At the corner joint, use a flat blade (like a putty knife or drywall blade) and use the flat edge and tip of the blade to push the insulation into the corners, allowing just enough room to fasten the screws and washers into the wood piece you installed during your prep. Fasten the screws at least every 2’-4' from the bottom to the top.

Remember, you can easily cover the screws with our matching tape to make them disappear or you can pre-paint the screws and washers white to match the BlueTex™.
STEP 3: Gable Ends
Connecting the gable ends to the roofline may also require some insulation tape to get a good airtight seal. When possible, utilize the wood strips in corners and around doors to help you have a flat surface to fasten into.

STEP 4: Finishing Up/Taping Seams
Finish closing/taping all the seams on the walls and roofline.


Use extra tape to “clean up” any exposed seams or loose pieces from cutting.


We realize that insulating a metal building can be a challenging project. However, we can confidently say that both the improved comfort and elimination of sweating/condensation are absolutely worth it!
We have worked with thousands of building owners who have installed a radiant barrier in their buildings as a form of an insulation system and they are consistently amazed at what a difference it makes.
We also offer real customer support/technical advice from real people. We are not here just to sell you a product and let you figure it out on your own. We are here to provide you with a quality solution and help you make the most of it!
If you need help planning or installing your project, please contact our experts. It’s best to send a short summary of your project and any questions you have. Then, our experts will call or email you back for any extra details we need to help you choose the best metal building insulation rolls for your building.
Watch this customer install the Pro 2mm BlueTex™ inside his metal garage:
STEP 5*: Interior Finishes
This step is optional and is purely for cosmetic purposes. You can leave the interior layer of BlueTex™ exposed and the installation will be done. If you want a completely finished look, however, you can cover the white surface of the BlueTex™ with just about anything for an interior finish.


Depending on your application and what you use the metal building for, the most common interior finishes are OSB, plywood, tongue, and groove or drywall to secure shelving, signage, racks, etc.

Another tip that customer feedback has raved about is adding a piece of trim to the bottom of the BlueTex™ along the floor to protect the edge from wear and tear.
Not Sure How Much BlueTex™ You Need?
FAQ:
Why Is Insulation for Metal Buildings Important?
Without proper insulation, your metal building can be prone to excessive heat loss or heat gain depending on the weather conditions outside. These fluctuations in temperature inside can make the building uncomfortable.
Not only that, but due to the changes in temperature, condensation can become a major problem as the metal building will begin to trap moisture. Condensation begins to form when warm, moist air comes into contact with a cold surface, such as the metal panels on the roof of the building. This can result in the formation of rust, corrosion of the building structure and materials, and more.
Is Steel Building Insulation a Worthwhile Investment?
If you want to minimize heat transfer and keep your building comfortable while eliminating condensation, rust, and damage to your building then yes, installing insulation in your existing building is a great idea and a worthwhile long-term solution. That's why we created our own product to help reflect radiant heat while providing your metal building with a nice interior finish.
Where Do I Get All the Supplies From for the Installation?
We have everything that you may need available. Head over to our resources page where you’ll find everything you could need to successfully insulate your metal building.
Can You Help With the Installation of Insulation for Metal Buildings?
Yes, we can! If you are struggling with the actual installation or are planning everything out, feel free to contact us at any moment and we’d be more than happy to advise you accordingly.
What About Venting a Metal Building?
If you are never heating or cooling the metal building, cutting a vent slit in the ridge is ok. This is primarily used if you are doing work that makes exhaust, fumes, heat, etc. and you need/want to vent that out.
Combining a vent in the ridge with open doors and windows will naturally vent the building. Simply cut a 2” vent slit in the ridge through the BlueTex Insulation. It does not have to be continuous. Cutting out 24” long sections between the framing in a few sections will work great. However, keep in mind that the metal building will be cooler in the winter since you are allowing cold air from outside to enter the building.
If you are planning on occasionally running a heater or an AC unit, then you do not want to vent the building. When you are creating a temporary “conditioned” space - heated or cooled, think of it as basically a refrigerator to keep the hot or cold air inside the box. The last thing you would do to your refrigerator is start cutting/drilling holes in it.
What’s the Best Solution for Metal Building Ventilation?
We recommend an electric gable fan with louvers on the opposite end of the doors. This allows you to ventilate as needed by turning the fan on/off. Remember, the foil insulation will act like shade for your metal building and a fan can help create a “cool breeze” through the building. When you want to heat/cool the building, you will leave the fan OFF and this way you can still maintain a mostly airtight building without much air leaks to keep the cold or warm air inside.
If you have any questions about this install process, feel free to contact us at 800-595-8772!