New Construction Wood-Framed Buildings Installation
For a new wood frame building the basic application is to wrap the wood frame on the exterior with the foil facing outward. Then, create the required airspace between the foil and the exterior surface (metal, wood, siding etc.) using ¾” furring strips (girts).

On a non-conditioned building, there really is nothing better than a radiant barrier to control the heat gain. Structures like sheds, carports, and barns can all benefit greatly by adding a layer of radiant barrier on the walls & roofline.
Below is the BASIC install guide for most wood frame buildings – but we know there are wide variations of how buildings are built. If you have a specific question about how to install BlueTex™ in your particular building and think these directions won't work for your building, please email us pictures and/or drawings and we will be glad to help you.
STEP 1
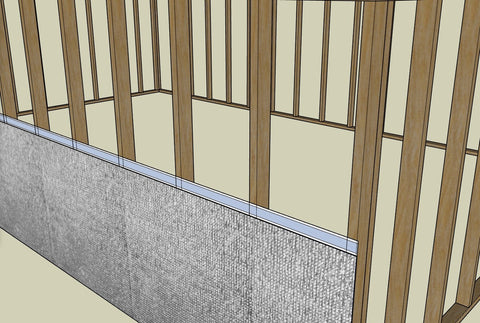
WRAP IT: Run BlueTex™ insulation along the bottom edge of the building.

Put the tape edge facing the top inside against the framing with the foil side facing towards the outside. *DO NOT expose the adhesive edge yet.*

Using roofing cap nails or screws with locking insulation washers for the tightest fit to attach the insulation to the wood framing. Additionally, you can use ½" staples as a third option to fasten the BlueTex™ to the wood.
Typically, attaching to every second or third stud works fine. Use our screws and locking washers (or a staple or cap nail) and attach the BlueTex™ to each stud to keep the edge from falling forward.
You can even wrap the insulation around the corners, and continue down the next side.

If your roll ends in the middle of a run, it’s best to cut it at the edge of a stud. Then, start the new piece a few inches back to keep going. *DO NOT REMOVE THE PAPER BACKING ON THE TAPE EDGE YET!*
STEP 2
KEEP GOING: Install the next run of BlueTex™ right above the first one. Align the bottom of the 2nd piece of foam to the top of the foam from the first piece with no gap. *DO NOT REMOVE TAPE PAPER BACKING on first run yet* Attach the top ¾ of the second run. For now, DO NOT staple/attach the bottom 12”. Next, lift up the bottom 12” of your second run, and begin to remove the paper backing on the adhesive edge. Gently press the 2nd run onto the tape tab to seal the seam. Then, staple/nail the bottom 12” of 2nd run to the stud.
STEP 3
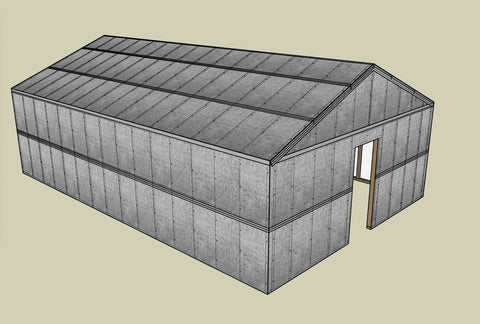
FINISH WRAPPING WALLS: At this point you want to continue following STEP 2 until you're done with all of the walls.
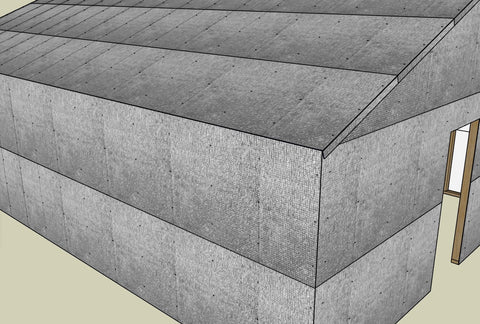
DO THE ROOF: Start at the bottom edge and work up toward the ridge, using the same technique in steps 1 & 2 for the walls.
Roof Ridge: Overlap the insulation 6” on the ridge of the roof.
Roof Edge: Run BlueTex™ insulation 3" to 4” over the edge of the roof and onto both the side walls and gable ends. Then, staple (or nail) the insulation into the wood framing. If needed, use tape to secure the edges.
STEP 4*
*optional
This next step is optional and it will not change the reflectivity or performance at all, but it looks nice and some people prefer to do it.
Tape the foil seams on the outside. This will “clean up” the installation if you have any loose flaps, edges, seams, etc. The main benefit from taping the seams is that it will reduce the possibility of moisture or condensation from occurring on the inside of the building at the seams, which if it did form, would be minimal, thus the reason this is an optional step.
STEP 5
INSTALL GIRTS or FURRING STRIPS: 1x4 boards spaced 2 feet to 4 feet apart on the exterior walls and roof before putting the metal on. We suggest you check the manufacturers recommendations for the metal/siding/etc. that you're using on your building.


STEP 6
INSTALL METAL, or SIDING: Screw or nail on the metal, wood or other type of siding into the girts to finish your outer layer (cladding). Finish out the installation by adding the final touches with any trim pieces on your corners, the ridge, around the doors, windows etc.


If you have any questions about this install process, feel free to contact us!