When and How to Seal Fasteners & Penetrations in Metal Buildings

Every hole you make in a vapor barrier is a small door for moist air, so seal any penetration you can reach from the inside, and seal it before the job is closed up.
A metal building is basically a big steel box. Steel is great at keeping out rain and wind, but it gets cold fast, and cold metal plus humid air is a recipe for "sweating" — water drops forming on the underside of the roof and walls, then dripping onto equipment, vehicles, hay, and whatever else you store inside.

That is the problem BlueTex® insulation is built to help with. A continuous BlueTex® layer, with its seams taped, acts as a vapor barrier between the humid inside air and the cold steel. The key word is continuous. Screws, bolts, conduit, pipes, vents and hangers all have to pass through somewhere, and each one punches a hole in that barrier. A barrier with a hundred untaped holes behaves a lot less like the barrier it is and more like a vulnerable covering.
This guide explains, in plain language, why those holes matter, which ones matter most, and exactly how to seal them — mostly with BlueTex® white vapor barrier seam tape, with gaskets, flashing and sealant filling in where tape alone isn't the right tool.
A Few Terms First
You don't need a building science degree for this, but a handful of words will come up again and again.
| Term | What it means |
|---|---|
| Water vapor | Water in the form of an invisible gas mixed into the air. Warm air can hold more of it than cold air. |
| Humidity | How much water vapor is in the air. People, animals, wet concrete, propane heaters and open doors on a rainy day all add humidity to your building space. |
| Dew point | The temperature at which air can't hold its water vapor anymore, so some of it turns back into liquid. Think of a cold soda can "sweating" on a summer day. Note: dew point isn't a set number, it fluctuates daily, even hourly. |
| Condensation | The liquid water that forms when humid air touches a surface colder than its dew point. |
| Vapor barrier (vapor retarder) | A layer that slows water vapor from moving through it. BlueTex® insulation, with its seams properly overlapped and taped, plays this role. |
| Perm rating | A number that tells you how easily water vapor passes through a material. Lower perms = a better vapor barrier. |
| Air leakage | Air physically flowing through a gap or hole, carrying its moisture with it. |
| Diffusion | Water vapor slowly soaking through a solid material, with no hole involved. |
| Penetration | Anything that passes through the barrier: a screw, bolt, pipe, wire, conduit, vent, light hanger or a rip. |
| Fastener | A screw, bolt or rivet that holds parts together. |
| Purlins and girts | The horizontal steel members that the roof panels (purlins) and wall panels (girts) attach to. |
| Thermal bridge | A path, usually metal, that carries heat (or cold) straight through the insulation. A steel screw is a tiny thermal bridge. |
| Flashing | Bent sheet metal or a molded boot that sheds rain away from a joint or opening on the outside of the building. |
| Gasket | A soft rubber ring or washer (often EPDM, a weather-resistant rubber) that squeezes tight around a fastener or pipe to seal it. |
| Sealant | A gooey material from a tube, like butyl or polyurethane, that fills gaps and stays flexible after it cures. |
How a Small Hole Becomes a Moisture Problem
Holes matter mostly because air moves through them, and moving air carries far more water than vapor soaking through a solid sheet.
Air Leakage Beats Diffusion
Building scientists have measured this for decades. Vapor diffusing through an intact barrier moves very slowly. Air rushing through a gap moves fast, and it brings all of its water vapor along for the ride. A single unsealed conduit hole can let through more moisture over a winter than the entire square footage of barrier around it.

So when you poke a screw or a pipe through BlueTex®, the issue isn't really the tiny bit of missing material. The issue is that you've created a channel where warm, humid air can get behind the barrier — right where it touches cold steel.
What Pushes the Air Through
Air doesn't sit still in a metal building. A few common forces push it toward any opening you leave:
- Stack effect: warm air rises and presses up against the roof, the same way a hot air balloon floats.
- Wind: gusts pressurize one side of the building and pull on the other.
- Fans and heaters: exhaust fans, unit heaters and big overhead doors all shove air around.
Cold Metal Finishes the Job
Once humid air slips behind the barrier, it meets the coldest surfaces in the building: the steel roof panels, purlins, girts and the fasteners themselves. If any of them are below the air's dew point, water condenses there.
Fasteners are a special case. A steel screw that goes from the outside panel inward is a thermal bridge — it carries outdoor cold right into the building. On a cold night the tip of that screw can be colder than anything around it, and you'll often see a drip, or even a little bead of frost, hanging off each one. That's why you'll sometimes hear people describe a metal roof as "raining" inside.
Where the Water Ends Up
Water that condenses behind the barrier has nowhere good to go. It can run along purlins and drip out at seams, soak into wood blocking or framing, rust fasteners and panel laps from the back side, and stain or ruin what's stored below. None of that happens all at once — it builds slowly, season after season, which is why sealing correctly during installation is so much easier than fixing it later.
Inside vs. Outside: Two Different Jobs
The outside of the building keeps liquid water (rain and snow) out; the inside barrier keeps humid air away from cold steel.

A roof screw with a good rubber washer can be perfectly rain-tight and still be a moisture problem from the inside. Likewise, taping a pipe on the inside does nothing to stop rain running in around it on the roof.
| Outside (weather side) | Inside (vapor barrier side) | |
|---|---|---|
| What it stops | Rain, snow, wind-driven water | Humid indoor air reaching cold metal |
| Main tools | Flashing, pipe boots, closure strips, EPDM-washered screws, exterior sealant | BlueTex® white vapor barrier seam tape, gaskets, interior sealant |
| Golden rule | Shed water downhill — upper pieces overlap lower pieces, like shingles | Keep the barrier continuous — no gaps, no open edges |
| If it fails | Leaks and drips during storms | Drips and "sweating" on cold, still days and nights |
A handy way to tell which kind of problem you have: if it drips only when it rains, look outside first. If it drips on a cold, dry morning, look at the inside thermal barrier.
When to Seal: What Matters Most
Seal the biggest holes first, because a hole's size and the gap around it decide how much air gets through.
Not every penetration carries the same risk. Here's how to prioritize, from most important to least:
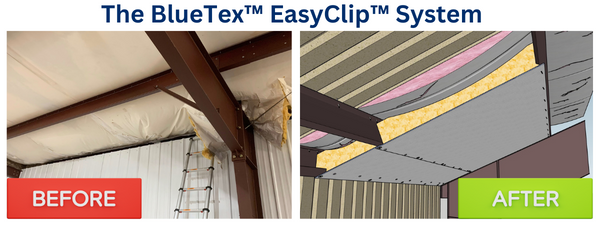
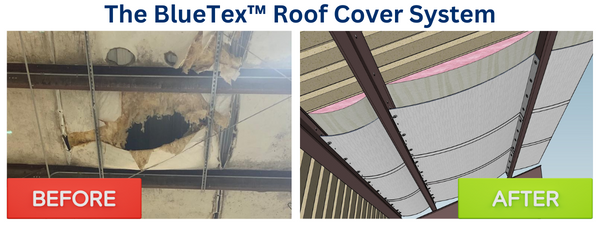
- Rips, tears and open seams. A torn flap or an untaped seam is the largest opening you can have. Fix these before anything else. If you have mostly ripped or torn insulation, consider the BlueTex® Cover System to repair large areas of old insulation, or even the entire building including walls and roofline.
- Large round penetrations — plumbing vents, exhaust fan ducts, stovepipe clearances (follow the stove maker's required clearances), HVAC lines, and sprinkler pipes. These leave a ring-shaped gap around the pipe.
- Electrical: conduit, cable runs and electrical boxes that pass through the barrier. Wires are often added after the insulation is in, so they get missed.
- Framed openings: where the barrier meets door frames, window frames, skylights and overhead door headers. The barrier has to be sealed to the frame, not just stopped near it.
- Hangers and supports: threaded rod, light hangers and anything bolted through to hold equipment.
- Fastener tips and loose screws. Screw points that poke through the barrier into the building, missed screws (holes with no screw in them), and stripped screws that spin.
What About the Screws That Hold the Panels On?
When BlueTex® metal building insulation is held tight between the steel framing and the panels, the panel screws pierce it and clamp it down. A screw that's driven snug through a tightly held sheet leaves a very small, mostly closed hole. Those usually don't need to be taped one at a time.
The ones that do need attention are:
- screws that missed the purlin or girt and left an open hole,
- screws that were backed out or replaced,
- screw tips that stick out into the building where you can see condensation or frost forming, and
- any spot where the barrier is loose or wrinkled around the screw instead of flat.
The Best Time to Seal
During installation, before anything covers it up. Tape seams as you go, then do a full walk-through after the other trades finish — electricians, plumbers and HVAC installers are the most common source of new holes. It's far easier to tape a pipe on day one than to reach it later over a parked truck or a full pallet rack.

If the building is already finished, do your walk-through on a cold morning. Drips, damp spots and frost will point you right to the penetrations that need work.
How to Seal Each Kind of Penetration
Tape is your main tool on the inside; reach for a gasket, flashing or sealant only when the shape or the job calls for it.
Step Zero: Prep for Tape That Actually Sticks
Tape only works if it bonds. Most tape failures come from skipping this part.
- Clean: wipe off dust, metal shavings and oil with a dry rag. Drill shavings are sharp and will cut the tape later.
- Dry: never tape over condensation or frost. If the surface is wet, wait or dry it first.
- Warm enough: check the temperature range on the tape label. Cold tape and cold surfaces don't bond well, so in winter, tape during the warmest part of the day.
- Flat: smooth out wrinkles in the BlueTex® around the hole before you tape.
- Press hard: run a small roller, a plastic squeegee or your palm firmly over the whole piece. Pressure is what makes the adhesive grab.
A good rule of thumb: every patch should extend at least 1.5 inches past the hole in every direction, and should go onto clean BlueTex®, not onto other tape that's peeling. If you need wider tape, look at our 4" wide white vapor barrier seam tape and our 6" wide white vapor barrier repair tape.
Screws, Bolts and Rivets
- Missed or empty screw holes: cover with a square of seam tape, ~2 inches bigger than the hole on all sides.
- Screw tips poking into the building: press a square of tape over the tip so it lies flat on the barrier around it. If the point is long enough to cut the tape, place a small dab of sealant over the tip first, let it skin over, then tape.
- Bolts and threaded rod: for a bolt head, tape over it like a screw. For threaded rod that hangs down, use the collar method below (the same as a pipe), then wrap the tape snugly around the rod.
- Stripped or loose fasteners: replace them on the outside first (usually with a slightly larger screw and a new EPDM washer), then patch the inside.

Pipes, Conduit and Round Penetrations — the "Star and Collar" Method
This is the most useful technique to learn.
- Cut a star, not a circle. Where the pipe or conduit goes through, cut an X (or a star with 6–8 points) in the BlueTex instead of a round hole. The pointed flaps will fold along the pipe and make the seal easier.
- Push the pipe through and fold the flaps so they lie along the pipe.
- Tape the flaps down to the pipe with short strips of seam tape, going around the pipe.
- Make a collar. Tape around the base of the pipe in short overlapping pieces (3–4 inches long), each piece half on the pipe and half on the flat BlueTex. Short pieces bend around curves much better than one long strip.
- Finish with a wrap of tape around the pipe over the tops of the collar pieces, and press everything down.
For pipes that will move or vibrate, or for larger ducts, a pre-formed rubber pipe boot or gasket is a better choice than tape alone. Slide it over the pipe, then tape its flat flange to the BlueTex® on all sides.
Electrical Boxes and Cable Runs
- Tape the BlueTex tightly to the outside edges of electrical boxes that sit in the barrier.
- Where cables or conduit pass through a hole bigger than they are, fill the leftover gap with sealant or a small foam gasket, then tape over it.
- Group wires through one opening when you can. One well-sealed hole is better than five hurried ones.

Framed Openings: Doors, Windows, Skylights
- Bring the BlueTex up to the frame and tape it directly to the frame, all the way around. Don't leave a gap of even an inch.
- Seal the corners with an extra square of tape, because corners are where tape is most likely to lift.
- On the outside, the opening needs its own weather details: head flashing over the top, and sealant or closure strips at the sides, installed per the door, window or skylight maker's instructions.
Roof Penetrations From the Outside
Plumbing vents, exhaust fans and other pipes that go out through the roof need a proper weather seal on top:
- Use a roof pipe boot (a flexible rubber flashing) sized for the pipe and made for metal roofs, so it can bend to the ribs of the panel.
- Install it with sealant under the base and fasteners as the boot maker directs.
- Position it so water runs around it, not into the upslope side. On larger penetrations, a curb or diverter may be needed.
Then go back inside and seal the same pipe to the BlueTex with the star and collar method. Both layers need to be done.
When to Use Sealant
Sealant is the right tool for odd shapes tape can't follow, gaps around clusters of wires, and covering sharp points. A few tips:
- Use a sealant made for metal buildings, such as butyl or polyurethane, and check that it's compatible with your tape if the two will touch.
- Avoid plain silicone where you plan to tape over it later — most tapes won't stick to cured silicone.
- Sealant fills a gap; it doesn't replace tape for bridging across a hole. Fill, let it skin over, then tape.
Common Mistakes to Avoid
Most sealing failures come down to the wrong tape, a dirty surface, or a hole someone added later.
- Using duct tape or painter's tape. Cloth duct tape dries out and lets go within a season or two. Use tape made for vapor barrier seams.
- Taping over wet, dusty or frosty surfaces. The tape may look fine on day one and peel off by spring.
- One long strip around a pipe. It wrinkles and leaves channels for air. Short overlapping pieces seal better.
- Cutting round holes for pipes. A round hole is always a little too big. Cut a star instead.
- Sealing only the outside. Flashing keeps the rain out but does nothing about humid inside air reaching cold steel.
- Forgetting the other trades. New conduit, a new exhaust fan or a new light fixture means new holes. Make "tape what you poke" a rule for everyone on site.
- Leaving the barrier loose at the edges. Where BlueTex meets the floor, eave, end wall or a framed opening, it needs to be taped or sealed to something solid, not just tucked behind it.
Quick Walk-Through Checklist
Before you call the job done, walk the whole building with a flashlight and check each item:
- All BlueTex® seams taped and pressed down, with no lifted edges
- Rips, tears and open flaps patched at least 2 inches past the damage
- Every pipe, vent and duct sealed with a star and collar or a gasket
- Conduit, cables and electrical boxes taped or sealed
- Barrier taped directly to every door, window and skylight frame
- Empty screw holes and exposed screw tips covered
- Hangers and threaded rod collared and wrapped
- Roof penetrations flashed on the outside with boots made for metal roofs
- Edges of the barrier taped or sealed at eaves, end walls and the base of the walls
The Bottom Line
A vapor barrier is only as good as its weakest hole. BlueTex® insulation does its job best as one unbroken layer, and keeping it that way mostly comes down to a roll of seam tape, a clean surface and a few extra minutes at each penetration. Seal the big holes first, tape what you poke, and handle the weather side with proper flashing and gaskets.
Have a penetration detail you're not sure how to handle? Contact us and we'll be glad to help you figure it out.